
Learn how to create tutorial videos that captivate and educate. Discover essential tips to produce compelling tutorial content today!
Creating a great tutorial video comes down to four key stages: planning your content, recording your screen or yourself, editing the footage for clarity, and publishing it for your audience to find.
At its heart, a successful tutorial solves a specific problem. It guides the viewer from confusion to a clear, achievable outcome.
Why tutorial videos are essential for growth
Tutorial videos are more than how-to guides. They’re assets that build trust, establish authority, and drive action. When people search for solutions, a well-made tutorial positions you as the expert with answers. It’s a direct line to your audience, showing you understand their challenges and have the skills to solve them.
This goes beyond explaining a process-it’s about building a relationship. When a viewer follows your instructions and succeeds, they feel accomplishment and gratitude. That positive feeling gets tied directly to you and your brand.
Building trust through visual learning
Most people prefer to learn by watching. A video lets you show instead of tell, creating a deeper and more memorable connection. Seeing a process happen in real-time clears up confusion and builds confidence in ways text can’t match.
As of 2025, 89% of companies are using video content, with a huge emphasis on tutorials and explainers. Even more telling: 89% of viewers say they’ve been convinced to buy a product after watching a brand’s video.
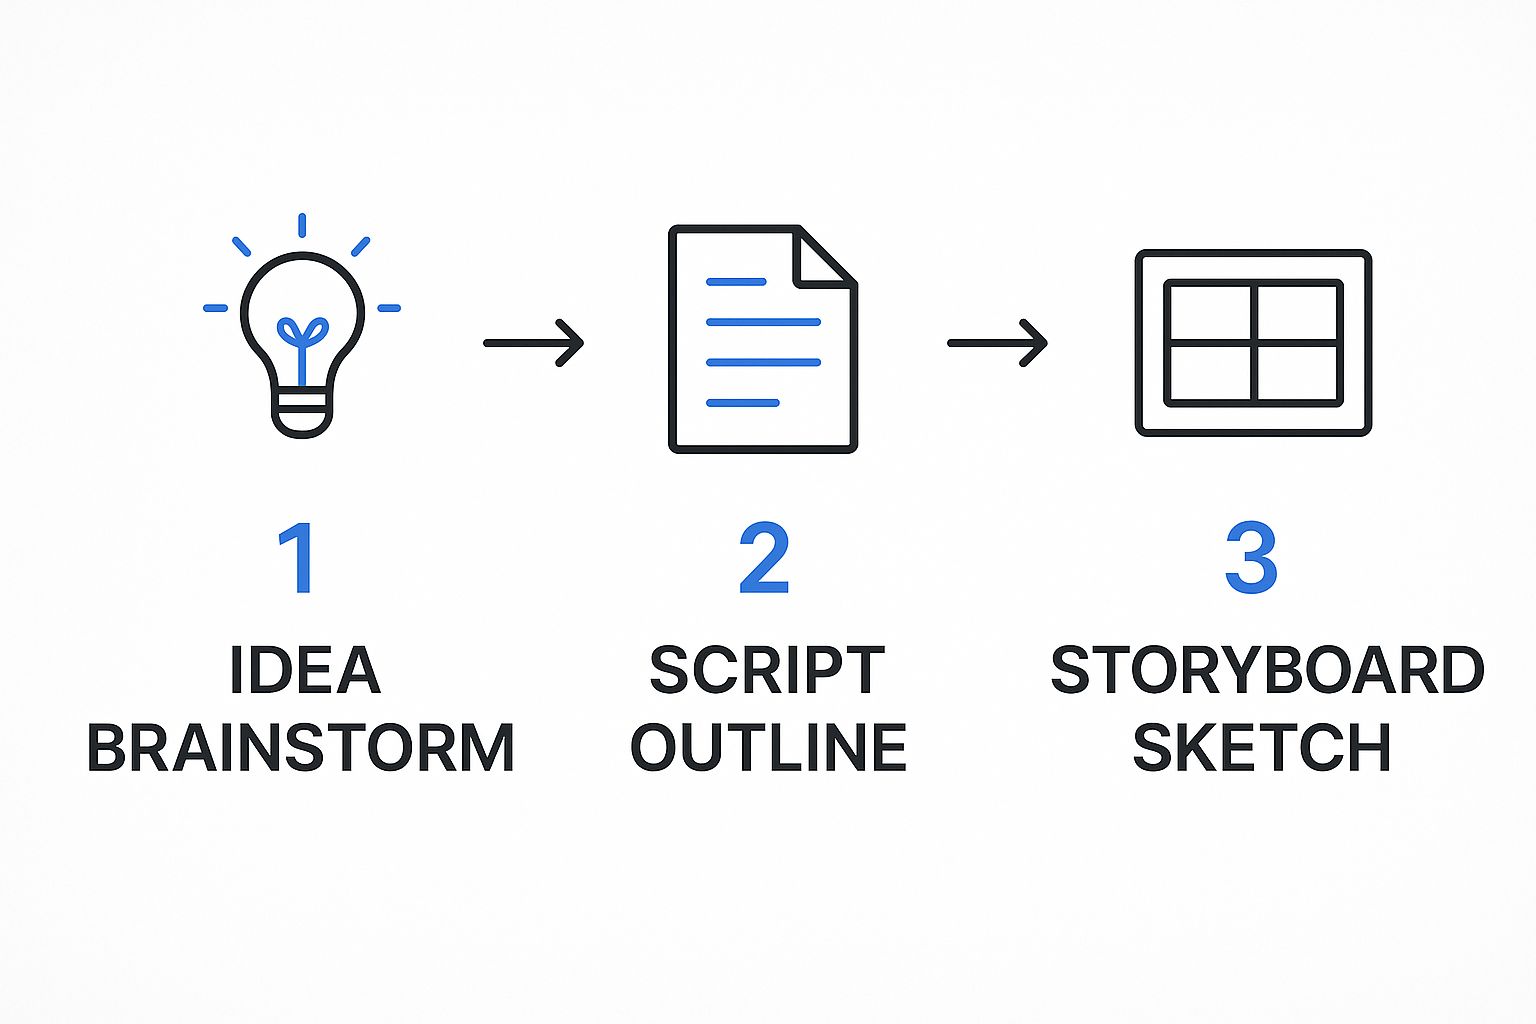
The creation process at a glance
Before diving into how to create tutorial videos, it helps to see the entire journey. I think of it as a production cycle with four distinct phases:
- Planning and scripting: Define your learning goal, figure out who you’re talking to, and map out your content. A solid script or outline is your best friend for concise, natural delivery.
- Recording and setup: Gather your gear-whether a smartphone or a pro camera-and prepare your space. Good lighting and clear audio are non-negotiable.
- Editing and polishing: Raw footage gets trimmed and transformed into a coherent story. Cut mistakes, add helpful graphics, and balance audio.
- Publishing and promotion: Upload to platforms like YouTube and share with the world to reach the right people.
Getting your head around these stages makes the whole project feel less intimidating. It turns a massive undertaking into achievable tasks.
Laying the groundwork for a great tutorial
Ever watched a tutorial that just flows? One that feels so clear you master a new skill without realizing it? That’s not an accident-it’s solid planning.
Jumping in front of a camera and winging it is the fastest route to a confusing, rambling video that viewers click away from in seconds. The real magic happens in pre-production.
Zero in on a single goal
Before hitting record, answer one crucial question: What is the one thing I want my viewer to be able to do after watching this video?
Be ruthless. The temptation is to cram everything you know into a single video, but that just overwhelms people. A tutorial on “How to Bake Sourdough Bread” is too broad. Focus on something specific and actionable, like “How to Feed and Maintain Your Sourdough Starter.” This respects your viewer’s time and gives them a clear win.
Scripting for natural flow
Once you have your goal, map out your content. When I say “script,” I don’t mean a rigid, word-for-word document that makes you sound like a robot. The best approach is what I call a “bullet point script”-a road map that gives you structure without stealing your personality.
For a software tutorial, it might look like this:
- Hook: “I’m going to show you how to create a pivot table in Excel in under two minutes.”
- First move: Guide them to the ‘Insert PivotTable’ button in the ribbon.
- The data: Show exactly how to select the right data range without grabbing extra rows.
- The magic: Drag and drop the fields to build the table-the core of the lesson.
- Wrap-up: Briefly recap and suggest what they could do next.
A simple outline keeps you on track and ensures you don’t forget a critical step when the camera is rolling. If you’re feeling stuck, browsing a list of how-to video ideas can spark creativity.
Visualizing your tutorial with a storyboard
Next, think with your eyes. A storyboard helps you plan the visual journey, matching on-screen actions to your script.
It doesn’t have to be a masterpiece-stick figures and quick notes work fine. The point is to pre-visualize the flow. This is especially important for screen recordings, where you need to decide which parts of the interface to zoom in on and what to highlight.
This planning workflow is the secret sauce behind polished tutorials. It helps catch potential issues early, preventing recording mistakes and saving headaches during editing.
Essential pre-production checklist
| Checklist item | Key action | Why it matters |
|---|---|---|
| Define the objective | Write a single, clear sentence stating what the viewer will be able to do | Keeps the video focused and prevents scope creep |
| Know your audience | Identify the viewer’s skill level (beginner, intermediate) | Ensures you don’t talk over their head or bore them with basics |
| Draft a bullet point script | Outline key talking points, steps, and transitions | Provides structure and confidence without sounding robotic |
| Create a storyboard | Sketch key shots, screen actions, and camera angles | Aligns visuals with the script for a seamless experience |
| Gather all assets | Prepare necessary files, software, props, or graphics beforehand | Prevents awkward pauses during recording |
Running through this checklist confirms you’ve done the strategic work. When prep is nailed, recording and editing become ten times easier.
Choosing your tools and setting up your space
Let’s clear up a common myth: you don’t need a Hollywood budget to create a great tutorial video. Getting the right setup is less about spending money and more about making smart choices for clean video and-most importantly-crystal-clear audio.

Many aspiring creators get stuck on the camera. They think they need the latest DSLR, but the smartphone you already own is probably a video powerhouse. Stick it on a simple tripod for a steady shot, and you’ll get sharp, high-quality video for most tutorials.
The real Achilles’ heel of a phone is its built-in mic. It picks up sound from all directions, including room echo and background noise you didn’t notice.
This brings me to the golden rule: audio quality is non-negotiable. People will tolerate video that isn’t perfectly lit, but they click away in a heartbeat if they can’t understand you. Muffled, echoey, or noisy audio is an instant credibility killer. If you’re going to spend money anywhere, spend it on a decent external microphone. A simple USB mic or a lavalier mic that clips to your shirt will make a world of difference.
Selecting your screen recording software
If your tutorial involves showing anything on a computer screen, you’ll need screen recording software. There are fantastic options from free to premium:
- Loom: My go-to for quick, informal tutorials. Incredibly easy to use and perfect for sending a fast walkthrough to a client or team member.
- OBS Studio: For those who want more power and don’t mind a learning curve. It’s free, open-source, and gives granular control over everything.
- Camtasia: A fantastic all-in-one package combining a robust screen recorder with a capable video editor. Built for making tutorials, with features like cursor highlighting and easy callouts.
Creating a distraction-free environment
Your recording space matters more than you think. You’re not aiming for a soundproof studio-just a quiet spot where you can control the environment. Find a room, close the door, and minimize interruptions from pets, family, or street noise.
Check what’s behind you. A cluttered background pulls focus away from your lesson. A plain wall or tidy bookshelf works well.
Finally, clean up your digital space. Before recording, clear your desktop, close extra browser tabs, and turn off notifications. A clean screen helps viewers focus on what you’re teaching.
How to record your tutorial with confidence
You’ve done the prep, your gear is set up, and now it’s time to face that “record” button. This is where nerves kick in, but recording with confidence is a skill you can build. It’s about managing your presence on camera and keeping your digital workspace clean.

Whether you’re showing your face, your screen, or both, your job is to be a clear and helpful guide. Bring energy to your voice and move through steps at a pace that’s easy to follow.
Mastering your on-screen presence
Talking to a camera lens can feel weird at first. A few tricks make a big difference. Before recording, do quick vocal warm-ups to prevent fumbling.
When you start, speak a little slower than normal conversation. Enunciate your words. Let your personality shine-don’t be afraid to smile, use your hands, and show genuine enthusiasm. That energy is infectious.
One thing I’ve learned: stop chasing the “perfect” take. It’s far better to get relaxed, “good enough” versions with natural energy than one robotic, flawless delivery. You can cut mistakes later during editing.
Nailing the screen recording
If your tutorial involves software, clarity is king. Your digital workspace needs to be as tidy as your physical one.
Before recording:
- Clean up your desktop: Hide icons and close applications you don’t need. A messy screen is a distraction.
- Highlight your cursor: Most screen recording tools can add a colored circle to your mouse. This draws the viewer’s eye where it needs to go.
- Slow down: Move your mouse and click deliberately. What feels slow to you is the right speed for someone watching for the first time.
Combining your face and screen in a picture-in-picture layout adds a personal touch and builds stronger connection. It also opens the door to more dynamic content-see our guide on how to create interactive videos. This gives you the best of both worlds: screen recording clarity and the trust from seeing a friendly face.
Editing your video for clarity and engagement
Your raw footage has potential, but it’s probably a bit of a mess. That’s normal. Editing is where you transform rough takes into a polished, professional tutorial.
This isn’t about Hollywood effects. The real magic of editing is in what you take away-refining, tightening, and making sure every second serves the viewer.
The essential first pass: trimming and cleaning
The first thing I always do is a rough cut. I chop off awkward beginnings and endings-the part where you’re fumbling with the record button. More importantly, I hunt down and eliminate every mistake, long pause, “um,” and repeated phrase.
Be ruthless. If a clip doesn’t directly help someone learn, it’s dead weight. A shorter, focused video shows you respect your viewer’s time.
Once video clips are in order, I turn to audio. People will put up with slightly grainy video, but they click away instantly if audio is terrible. Most editing software gives you these tools:
- Normalize volume: Balances audio levels so viewers aren’t constantly reaching for volume controls.
- Reduce background noise: Many editors have filters that reduce distracting hums or whines.
- Balance music: If you use background music, set it so you can barely notice it’s there. It should never fight for attention.
A clean audio track is the foundation of a professional-sounding tutorial. A few minutes balancing audio dramatically improves perceived quality.
Enhancing clarity with visual aids
With your timeline cleaned up, add the visual polish that makes instructions crystal clear.
Simple text overlays are great for introducing topics or defining terms. When editing screen recordings, zoom and pan effects are invaluable. Zooming in on the exact button you’re discussing prevents confusion. Callouts like arrows or circles pinpoint exactly what you want viewers to see.
When moving between scenes, stick to subtle transitions like fades or dissolves. Avoid cheesy star wipes-they just distract. The goal is smooth, seamless flow.
For the complete video creation workflow, our guide on how to create video tutorials walks through everything. Remember: every edit should have a clear purpose. If it doesn’t help, cut it.
Getting your tutorial seen
Creating a fantastic tutorial is only half the job. After planning, shooting, and editing, your video deserves an audience. The final piece is publishing and promoting so it reaches the people you made it for.
Simply uploading and hitting “publish” is a surefire way to get lost in the noise. The difference between a handful of views and a trusted resource for thousands often comes down to smart publishing strategy. Treat platforms like YouTube less like a video host and more like a search engine-give its algorithm every clue about what your video is and who it’s for.
Optimizing your video for search
First, nail the metadata that helps people and algorithms discover your tutorial: title, description, and tags.
- Craft a search-friendly title: Be crystal clear and pack in keywords your target viewer is typing into search. Forget generic titles like “Software Demo.” Go specific: “How to Create an Automated Welcome Sequence in Mailchimp.”
- Write a description that hooks: The first couple of lines show in search results-summarize what the video teaches and include your main keyword. Add timestamps and links to relevant resources.
- Use smart tags: Brainstorm every term someone might search for. Mix broad terms (“email marketing”) with specific long-tail phrases (“Mailchimp automation tutorial for beginners”).
A custom thumbnail isn’t just a nice extra-it’s one of your most critical marketing tools. It’s the billboard for your video and the biggest factor in whether someone clicks. Use bold, readable text and a high-quality image that pops.
The average person watches around 17 hours of online video per week. With massive markets like India, the US, and Brazil leading viewership, thinking globally opens up a larger audience.
Building momentum with promotion
Once your video is live and optimized, give it a running start. Don’t just sit back and hope people stumble upon it. Create that initial traffic wave to signal to the algorithm that your content is worth watching.
Your own channels are the best place to begin. Announce to your email list-these are your most engaged followers. Share across social media, customizing captions for each platform.
An effective tactic is embedding the video in a relevant blog post on your website. This adds value to the article and can significantly improve performance. This approach is a cornerstone of any good video marketing strategy for small businesses.
For more ideas on promotion, the Meowtxt blog has great tips on content promotion you can adapt for video tutorials. The goal is driving that initial burst of views, which tells platforms you’ve got something good.
Common questions about making tutorial videos
Even with the best plans, questions pop up when you’re getting started. Let’s walk through common hurdles so you can get past them.
What’s the “right” length for a tutorial?
It depends on your topic. For a single, specific skill-like finding the pivot table button in Excel-keep it tight. Aim for 2-5 minutes. People want a quick, direct solution.
For more involved topics, like a complete photo editing workflow, you’ll need more time. 5-15 minutes is reasonable for complex subjects. Anything longer risks drop-off unless it’s framed as a deep-dive masterclass.
The golden rule: be as long as you need to be, but as short as you possibly can. Never add filler to hit a certain time.
Do I really have to show my face?
Short answer: no, but you probably should.
Putting your face on camera, even in a small picture-in-picture window, builds trust. It reminds viewers that a real, knowledgeable person is guiding them.
That said, if being on camera makes you want to abandon the whole project, don’t. A crisp screen recording paired with clear, energetic voiceover is still incredibly effective. Your expertise is what matters most.
What’s the single biggest mistake I can make?
Hands down, it’s bad audio. Viewers won’t forgive it.
You can get away with slightly grainy video or less-than-perfect lighting, but if audio is full of echo, background noise, or sounds like you’re talking through a tin can, people click away instantly. If they can’t understand you, the tutorial is worthless.
A decent external microphone is the single most impactful upgrade. A simple USB or lavalier mic costs less than a nice dinner and makes your videos sound a thousand times more professional.
Ready to take your tutorials from passive instruction to active learning? VideoQi lets you embed clickable chapter markers, quizzes, and calls to action directly into your video player-turning viewers into engaged participants.


